
Sunday, 5 May 2013

Monday, 25 March 2013
Nikon D3200 Digital SLR Camera
Nikon D3200 Digital SLR Camera

With the announcement of the Nikon D3200, Nikon has raised the bar for image resolution in the sub-$700 camera category. The Nikon D3200 camera combines a 24MP DX-format (APS) CMOS sensor with a feature set that’s designed to please snapshooters who are stepping up from point-and-shoot photography and for more serious shooters looking for a low-cost second body.
Nikon’s popular Guide Mode, which was introduced with the D3000, offers on-screen guidance for beginners and holds your hand as it allows you to explore the camera’s range of creative picture-taking options. Full HD 1080p video capture should appeal to budget-conscious videographers.
The camera is lightweight; it is well-suited for soccer moms who want to capture Junior’s sports activities with its 4 fps burst rate. The Nikon D3200 is compatible with a new WU-1a Wireless Mobile Adapter ($59.95; also available for pre-order), which can send images to mobile devices like smartphones and tabletsand let you control the camera remotely from your device Key features include: 24MP DX CMOS sensor ISO range 100-6400, expandablre to 12,800 Expeed 3 image processing engine 3-inch, 921k LCD monitor 1080p HD video at 24 or 30 fps Stereo microphone jack 4 frames per second burst mode 11-point AF system Guide Mode Six Scene Modes”
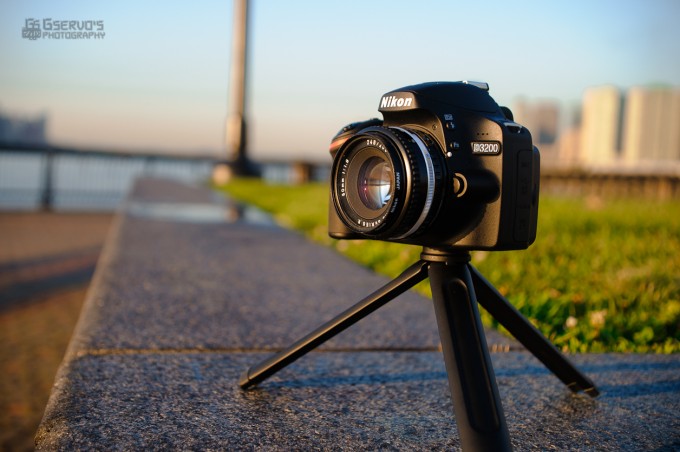
With the announcement of the Nikon D3200, Nikon has raised the bar for image resolution in the sub-$700 camera category. The Nikon D3200 camera combines a 24MP DX-format (APS) CMOS sensor with a feature set that’s designed to please snapshooters who are stepping up from point-and-shoot photography and for more serious shooters looking for a low-cost second body.
Nikon’s popular Guide Mode, which was introduced with the D3000, offers on-screen guidance for beginners and holds your hand as it allows you to explore the camera’s range of creative picture-taking options. Full HD 1080p video capture should appeal to budget-conscious videographers.
The camera is lightweight; it is well-suited for soccer moms who want to capture Junior’s sports activities with its 4 fps burst rate. The Nikon D3200 is compatible with a new WU-1a Wireless Mobile Adapter ($59.95; also available for pre-order), which can send images to mobile devices like smartphones and tabletsand let you control the camera remotely from your device Key features include: 24MP DX CMOS sensor ISO range 100-6400, expandablre to 12,800 Expeed 3 image processing engine 3-inch, 921k LCD monitor 1080p HD video at 24 or 30 fps Stereo microphone jack 4 frames per second burst mode 11-point AF system Guide Mode Six Scene Modes”
Wednesday, 20 July 2011
Sony Cyber-shot DSC-WX7 Review
For a while, there was something about the Sony Cyber-shot DSC WX7 that we couldn’t quite put our finger on. However, now we know what it is. Look at it - at first glance it’s juat a simple, grey rectangle that would be a perfect companion for the happy snapper. But then look more closely at the specification: 16.2 million pixels sat in front of Sony’s prestigious Exmor R CMOS sensor, AVCHD Full HD video, Carl Zeiss lens, 3D sweep panorama, stereo sound, background defocus and multi shot layering. That feature-set is more at home in a prosumer model costing upwards of £400. However, at around £200, the price is tempting but it may be the unusual and advanced features that dissuades you because of their complexity. If that’s the case, we’re going to take a look at them now and hopefully put you at rest. The Sony DSC-WX7 is available in silver or black and costs around £229.99.
As we said, the Sony Cyber-shot DSC WX7 is a simple, grey rectangle but that's not to say that it's in any way ugly. In fact, the clean, sleek lines and small rounded corners make for an attractive unit. The lens barrel - although only holding a modest 5x optical zoom - takes up the majority of the front. An ultra small flash sits just next to the lens along with the AF light.
The design makes us think that this is a camera styled for the tech-savvy and types that aren't into all this retro malarky. It's extremely futuristic and minimal. The power button is a very small affair and sits into the body so as not to attract attention. This is also useful for not accidentally pressing it instead of taking a picture. The shutter release has been retained at a size normally seen on larger cameras but the front 25% has been squared off to fit with the front of the camera. This odd shape would normally be problematic for operating the zoom switch as it needs a perfect circle to wrap around. Sony have overcome this by making the shutter release turn with the zoom switch. After all, you're not touching the shutter release when zooming so it doesn't really matter.
On the back of the Sony Cyber-shot DSC WX7 the features look pretty simple but Sony have integrated them with the screen, so accessing them will enable alternative options on screen. The top switch moves between taking pictures, panoramics and video. Panoramic pictures are taken using Sony's sweep panorama and new 3D sweep panorama. A dedicated video button is located to the right of this switch and is close to the thumb for fast acting video in case of a candid situation. The small ring in the middle can be pressed as a left, right, up and down navigation pad or rotated like a command wheel when there's a mode to adjust on the screen. Scrolling the wheel at any other time accesses the mode dial where you can choose the mode you want the camera to be in. There are 6 options including intelligent auto, superior auto, program, 3D shooting, scene modes and background defocus. The latter mode works by taking two pictures, one in focus and one out of focus. It then masks the sharp area of the photograph and layers it with the out of focus background to create depth of field. This technique came about because digital compact camera sensors are very small and so have a wide depth of field. Backgrounds that would be out of focus on a DSLR at f/8 are perfectly in focus on a compact camera. Therefore the need to cheat is necessary.
The WX7 harbours one of the best sensors available today. The Sony Exmor R sensor is one of the first back illuminated types released on the market. It works by removing the circuitry that normally surrounds each pixel and places it on the back of the sensor. The circuitry can sometimes block light getting onto the sensor which means the light signal is weaker. To boost the signal, the camera will adjust ISO which also introduces noise. The removal of the circuits obviates the issue and allows for lower ISO to be used in low light which gives smoother pictures. If that's not enough, the new Sony superior auto system betters intelligent auto by producing what Sony call DSLR quality images. It works by taking a series of pictures in a row of the subject at different settings. It then selects the bits of each picture that have the best focusing and exposure before merging them all together into one perfectly focused and perfectly exposed image.
The Sony Cyber-shot DSC WX7 appears to be made to a high standard. The metal casing ensures durability while there are no bits sticking out that can get caught and snapped off. There are one or two areas we'd like to see changed. For example, the USB port is exposed yet the HDMI slot has a cover. The battery door, although not bendy at all looks like it's made from a bit of weak plastic. The bit that infuriated us most was the mode dial. It's worth noting that this only annoyed us because of the way we operated it and we understand that anyone using it the opposite way shouldn't have this. To go to a mode that was above the one we were on, we moved the dial up (placing our thumb on the left side of the dial and turning it clockwise) but this brought the mode up from below the one we were on, so we had to rotate it the other way. Placing our thumb on the right side of the dial would correct this because to move to the option above would move the dial anti-clockwise and bring it the right way. We think that it's because the display is on the screen and we think that if the modes were physically on the dial, it wouldn't be an issue. To us, it was an optical illusion: To move up, we moved our thumb up where we had to move it down.
Should you decide not to use the mode dial, you can still access the main options by going into the main menu. There's also an easy mode for simplifying everything if it all gets a bit too much. One thing we find interesting is the lack of a macro mode. The camera has a macro focusing of 5cm at wide angle but there's no way to enable it. That's because it's integrated into the camera anyway. We've thought for a while that the macro mode is simply redundant because the picture quality doesn't change regardless of the mode so why not just have the lens focusing from macro to infinity and that's what Sony have started to do.
Instead of separating the quick access functions and main menu with two different buttons, Sony have placed an option to enter the main menu in the function menu. This is a clever little idea that makes space and reduces clutter on the camera. The main menu accesses the more core areas such as what video format to use, the red-eye and blink alert values as well as colour, noise and language settings. When the camera is first turned on, you can set the colours. There's a choice of three: Orange and black, orange and white or hot pink and light pink. You can change this in the display colour setting if you want to.
The Sony Cyber-shot DSC WX7 has a dedicated playback button in the bottom right of the body. The delete button is situated next to playback button and when you're not looking at the pictures you've taken, it works as a help guide to aid your picture taking skills. Changing the display in the playback mode will bring up all the information about the picture such as ISO, white-balance, aperture and shutter speed as well as the file name and histogram. In the menu there's viewing modes, retouching options and delete options too.
In the box, the Sony Cyber-shot DSC WX7 comes with a quick start guide as well as the full user guide on the enclosed CD. The CD also includes Sony's PMB (Picture Motion Browser) version 5.5 for tagging, editing and uploading your pictures. Hardware that comes with the camera includes a mains plug for the charging unit. Although it's not a stand alone type. The charging unit has a USB port that then goes straight into the camera. This means that the camera can be plugged straight into a computer to charge and is great for if you're travelling.
Tuesday, 19 July 2011
Saturday, 16 July 2011
Paint Sculpture Tutorial
A Guest Post by Henning Huenteler from www.shutter-lag.com.
Paint sculptures are not only beautiful, they also offer a vast variety of different images that depend on many different factors. By experimenting with the main drivers, fantastic variations of different images can be achieved. In the following tutorial, I will introduce the equipment needed, the setup of all the gear and some first ideas for your own experiments.
The general setup is pretty easy and a perfect first step into high-speed photography. All that you need is a camera with a short shutter lag (DSLR), (at least) one speedlite flashgun, a microphone to trigger the flashes, an old speaker and some balloons.
This is the setup I use for my pictures:
Canon 60D Digital SLRCanon 580exII speedliteCanon 430exII speedliteYongnuo 560 speedliteAn old amp with a 2' speaker attached (this is just an active PC speaker as you can buy in every Wal-Mart or electronics store).The Stopshot by Cognisys (see below for detailed introduction)Some rubber balloons
The Yongnuo flash doesn’t have any TTL functions, but has to be set up completely in manual mode. However, as I am going to set up and fire all flashes manually, this fits my need perfectly. The price is unbeatable! The units are around 350 RMB ($55) in China and should still be reasonable in Europe or the US.
The principle is really simple: The paint is applied on a rubber skin of a balloon stretched over the speaker. Once a sound is played over the speaker, the elastic rubber will start vibrating with the sonic waves and the paint will start ‘dancing’ on it. The picture has to be taken just at the beginning of the sound, let’s say 20 – 30 milliseconds after it starts, or the paint will mix and the single colors will not be clearly separated from each other.
Since even modern SLRs do have a certain shutter lag (for my Canon 60D, this shutter lag is around 85 ms with locked-up mirror), the right moment would already be gone when the camera is ready. Therefore, I cannot take the camera to actually take the picture, but I have to open the shutter and use the speedlites to actually ‘pick’ the right moment. The speedlites have a much faster reaction time and are perfectly suited to take the picture when you are working in a dark environment.
In order to freeze exactly the right moment, I set the camera into ‘bulb’ mode and use a cable release to open the shutter. To avoid a bright background in the image, I have my entire setup in a dark room with covered windows to avoid any light from spoiling the pictures. The only light visible in the picture comes therefore from the 3 flashguns I trigger just a few milliseconds after the paint starts dancing on the speaker.
To trigger the flashes, you need some extra equipment. The Stopshot device I use will trigger my flashes automatically. If you just want to take pictures of paint sculptures, you would probably not need this, but I also use it for other high-speed photographies. Besides the Stopshot, there are several other devices including the Mumford Time Machine, the Arduino Board or the Hiviz Controller that will do the job. I guess the Time Machine and the Stopshot are the easiest one to use, as they come readily built with a nice manual. The Ardunio Board can be programmed completely individually and the Hiviz does not come as an assembled unit, but you have to build it by yourself. However, all of them should work well for this purpose.
If you are looking for a cheaper solution, it should also be possible to trigger the flashes with nothing more than a microphone, an amp and an ADC (but don’t quote me on that). I goggled the web for the specifications of the PC connector that is built into many speedlites, but there seems not to be a single standard. Different manufacturers seem to have different trigger voltages for the connection, but they all seem to be roughly around 5V. If you like to play around with some electronics, it should be possible to use a microphone, a little amp and an ADC to fire the flashes via the PC connector. If your flashgun does not have a PC connector, you can also take a hotshoe with a PC plug sold for a couple of bucks on the internet. To fire more than one flash, either use hotshoes with two connectors to daisy chain the speedlites or connect a Y-cable to your amp.
For the location of the flashes I usually choose 5 and 7 on a clock face, where the camera is on the 6 and the speaker on the 12. As I need to have a real short distance between the camera and the speaker and I need the paint to be illuminated from two sides, I need to dial down the power output of the flashes to reduce the light to a suitable amount.
Another reason to dial down the output power is the flash duration. The paint is moving really fast and a flash fired at full power would be way to long to freeze the action. There is a nice overview on the flash durations of all the flashes I use on http://speedlights.net/. With 1/1 power, the Canon 580exII has a flash duration of 1/285s, which is way too long. With a power of 1/128, this goes down below the minimum duration measurable with the meter they used (<1/8000s). This is just suitable for my purpose, so I usually fire all three flashes with either 1/64 or 1/128 power.
As mentioned before, I set the camera into bulb mode and open the shutter with a cable release. Although I work in a dark room, a try to keep the exposure time as short as possible, so I open the shutter, start the sound and as soon as the speedlites fire, I release the button again. The entire process of picture taking does not exceed 1 second.
To further improve the image, I usually shoot with ISO 100 or 200 maximum and close the aperture down to 13 or 16. By that, the image gets less noisy and I end up with a high depth of field. Closing the aperture even more would reduce the image quality, so you have to find a balance between sharpness and depth of field.
For the paint, I usually use gouache. Gouache is more viscous than watercolor and has a stronger, shinier color. I usually mix it with a little water, just to get just the viscosity I need. Here, you have to play around a little bit and see what gives the results you like best. Depending on the viscosity, the paint will look and behave differently. You can achieve everything between thick honey-like syrup to a splashy watery liquid.
To apply the paint on the rubber, I usually use a straw or a spoon, depending on the viscosity. I just use 1 or two drops per color. This is enough to throw the paint up in the air when the balloon is vibrating.
The sound that is used to make the balloon vibrating on the speaker is essential for the images. There are different factors that influence the behavior of the paint:
The volume or intensity of the vibration obviously has an impact on the intensity of the paints’ reaction to it. A loud sound will make the paint explode into the entirety of the room you are working in, while a very low volume will have no impact on the drops at all. You have to experiment a little bit to find the right amount to fill your frame but not end up sticking at the ceiling.The frequency will influence both, the intensity of the vibration and the shape of the paint sculpture. While a very low frequency will only result in a movement of the rubber skin with the paint on it, a high frequency will be too fast for the sluggish paint to jump up and start dancing. For my pictures, frequencies about 80 – 200 Hz where just right. Trying out different frequencies will give you a feeling for the effects you can achieve. The difficult thing is actually to decide which one you like.The timbre finally can shape your vibrations and create thousands of different sculptures. Go and try it out!
I usually generate the sound on an attached notebook, but you can probably use whatever source you want. A keyboard or even your electrical bass guitar would probably do. On my Mac I use the open-source software Audacity, which is very versatile and gives me the tools to experiment with all the parameters.
For my pictures, I usually use a black background. This is much easier than using a white one, especially for the beginning. By using snoots in front of my flashes and setting them in an angle to the direction of picture taking, I prevent any light from spilling on the background. Especially after some pictures, the background will be spilled with colorful drops, so you will see any reflection in your pictures if you are not careful with the direction of lighting.
Using a white background is much more difficult. I use at least one flash to directly light the background, but even then I usually have to improve it a little bit during the post-production. Another thing that makes white backgrounds difficult is the balloon. Even a white balloon will never be 100% bright, so it will be always visible if on the picture. One way to prevent having a grey balloon in the foreground is to exclude it from the photo frame. By doing so, the picture will only consist of the flying paint in front of a bight white background.
The post-production is fairly easy and there is not much to do if the shot is prepared well. I sometimes stamp out some drops of paint flying around and disturbing the entire composition or some areas where the background is not 100% black or white. Apart from that, I apply only some exposure correction or level adjustment and some sharpening. Voila, that’s it.
I tried to be as comprehensive as possible in this tutorial. If there should be any questions left, just ask in the comment section below and I’ll try to answer them all. The really important part about this is having fun during the shooting. All these setups can take a while and it can get quite frustrating to always clean up the balloon and prepare the next shot just for a process of picture taking that lasts well below one second. Especially, when I am experimenting with the trigger or the sound settings, it often happens that I set up everything correctly and just forgot one thing or the trigger doesn’t fire, so I end up flecked in paint and without a usable picture. Just remember: it’s all about the fun. And one more thing: put on some old clothes and cover all sensitive carpets or computers around.
Henning Huenteler is an enthusiastic amateur photographer from Germany, currently living and working in Beijing, China. He is mainly doing landscape and highspeed photography and is the author of www.shutter-lag.com.

Paint sculptures are not only beautiful, they also offer a vast variety of different images that depend on many different factors. By experimenting with the main drivers, fantastic variations of different images can be achieved. In the following tutorial, I will introduce the equipment needed, the setup of all the gear and some first ideas for your own experiments.
The general setup is pretty easy and a perfect first step into high-speed photography. All that you need is a camera with a short shutter lag (DSLR), (at least) one speedlite flashgun, a microphone to trigger the flashes, an old speaker and some balloons.
This is the setup I use for my pictures:
Canon 60D Digital SLRCanon 580exII speedliteCanon 430exII speedliteYongnuo 560 speedliteAn old amp with a 2' speaker attached (this is just an active PC speaker as you can buy in every Wal-Mart or electronics store).The Stopshot by Cognisys (see below for detailed introduction)Some rubber balloons
The Yongnuo flash doesn’t have any TTL functions, but has to be set up completely in manual mode. However, as I am going to set up and fire all flashes manually, this fits my need perfectly. The price is unbeatable! The units are around 350 RMB ($55) in China and should still be reasonable in Europe or the US.
The principle is really simple: The paint is applied on a rubber skin of a balloon stretched over the speaker. Once a sound is played over the speaker, the elastic rubber will start vibrating with the sonic waves and the paint will start ‘dancing’ on it. The picture has to be taken just at the beginning of the sound, let’s say 20 – 30 milliseconds after it starts, or the paint will mix and the single colors will not be clearly separated from each other.
Since even modern SLRs do have a certain shutter lag (for my Canon 60D, this shutter lag is around 85 ms with locked-up mirror), the right moment would already be gone when the camera is ready. Therefore, I cannot take the camera to actually take the picture, but I have to open the shutter and use the speedlites to actually ‘pick’ the right moment. The speedlites have a much faster reaction time and are perfectly suited to take the picture when you are working in a dark environment.
In order to freeze exactly the right moment, I set the camera into ‘bulb’ mode and use a cable release to open the shutter. To avoid a bright background in the image, I have my entire setup in a dark room with covered windows to avoid any light from spoiling the pictures. The only light visible in the picture comes therefore from the 3 flashguns I trigger just a few milliseconds after the paint starts dancing on the speaker.
To trigger the flashes, you need some extra equipment. The Stopshot device I use will trigger my flashes automatically. If you just want to take pictures of paint sculptures, you would probably not need this, but I also use it for other high-speed photographies. Besides the Stopshot, there are several other devices including the Mumford Time Machine, the Arduino Board or the Hiviz Controller that will do the job. I guess the Time Machine and the Stopshot are the easiest one to use, as they come readily built with a nice manual. The Ardunio Board can be programmed completely individually and the Hiviz does not come as an assembled unit, but you have to build it by yourself. However, all of them should work well for this purpose.
If you are looking for a cheaper solution, it should also be possible to trigger the flashes with nothing more than a microphone, an amp and an ADC (but don’t quote me on that). I goggled the web for the specifications of the PC connector that is built into many speedlites, but there seems not to be a single standard. Different manufacturers seem to have different trigger voltages for the connection, but they all seem to be roughly around 5V. If you like to play around with some electronics, it should be possible to use a microphone, a little amp and an ADC to fire the flashes via the PC connector. If your flashgun does not have a PC connector, you can also take a hotshoe with a PC plug sold for a couple of bucks on the internet. To fire more than one flash, either use hotshoes with two connectors to daisy chain the speedlites or connect a Y-cable to your amp.
For the location of the flashes I usually choose 5 and 7 on a clock face, where the camera is on the 6 and the speaker on the 12. As I need to have a real short distance between the camera and the speaker and I need the paint to be illuminated from two sides, I need to dial down the power output of the flashes to reduce the light to a suitable amount.
Another reason to dial down the output power is the flash duration. The paint is moving really fast and a flash fired at full power would be way to long to freeze the action. There is a nice overview on the flash durations of all the flashes I use on http://speedlights.net/. With 1/1 power, the Canon 580exII has a flash duration of 1/285s, which is way too long. With a power of 1/128, this goes down below the minimum duration measurable with the meter they used (<1/8000s). This is just suitable for my purpose, so I usually fire all three flashes with either 1/64 or 1/128 power.
As mentioned before, I set the camera into bulb mode and open the shutter with a cable release. Although I work in a dark room, a try to keep the exposure time as short as possible, so I open the shutter, start the sound and as soon as the speedlites fire, I release the button again. The entire process of picture taking does not exceed 1 second.
To further improve the image, I usually shoot with ISO 100 or 200 maximum and close the aperture down to 13 or 16. By that, the image gets less noisy and I end up with a high depth of field. Closing the aperture even more would reduce the image quality, so you have to find a balance between sharpness and depth of field.
For the paint, I usually use gouache. Gouache is more viscous than watercolor and has a stronger, shinier color. I usually mix it with a little water, just to get just the viscosity I need. Here, you have to play around a little bit and see what gives the results you like best. Depending on the viscosity, the paint will look and behave differently. You can achieve everything between thick honey-like syrup to a splashy watery liquid.
To apply the paint on the rubber, I usually use a straw or a spoon, depending on the viscosity. I just use 1 or two drops per color. This is enough to throw the paint up in the air when the balloon is vibrating.
The sound that is used to make the balloon vibrating on the speaker is essential for the images. There are different factors that influence the behavior of the paint:
The volume or intensity of the vibration obviously has an impact on the intensity of the paints’ reaction to it. A loud sound will make the paint explode into the entirety of the room you are working in, while a very low volume will have no impact on the drops at all. You have to experiment a little bit to find the right amount to fill your frame but not end up sticking at the ceiling.The frequency will influence both, the intensity of the vibration and the shape of the paint sculpture. While a very low frequency will only result in a movement of the rubber skin with the paint on it, a high frequency will be too fast for the sluggish paint to jump up and start dancing. For my pictures, frequencies about 80 – 200 Hz where just right. Trying out different frequencies will give you a feeling for the effects you can achieve. The difficult thing is actually to decide which one you like.The timbre finally can shape your vibrations and create thousands of different sculptures. Go and try it out!
I usually generate the sound on an attached notebook, but you can probably use whatever source you want. A keyboard or even your electrical bass guitar would probably do. On my Mac I use the open-source software Audacity, which is very versatile and gives me the tools to experiment with all the parameters.
For my pictures, I usually use a black background. This is much easier than using a white one, especially for the beginning. By using snoots in front of my flashes and setting them in an angle to the direction of picture taking, I prevent any light from spilling on the background. Especially after some pictures, the background will be spilled with colorful drops, so you will see any reflection in your pictures if you are not careful with the direction of lighting.
Using a white background is much more difficult. I use at least one flash to directly light the background, but even then I usually have to improve it a little bit during the post-production. Another thing that makes white backgrounds difficult is the balloon. Even a white balloon will never be 100% bright, so it will be always visible if on the picture. One way to prevent having a grey balloon in the foreground is to exclude it from the photo frame. By doing so, the picture will only consist of the flying paint in front of a bight white background.
The post-production is fairly easy and there is not much to do if the shot is prepared well. I sometimes stamp out some drops of paint flying around and disturbing the entire composition or some areas where the background is not 100% black or white. Apart from that, I apply only some exposure correction or level adjustment and some sharpening. Voila, that’s it.
I tried to be as comprehensive as possible in this tutorial. If there should be any questions left, just ask in the comment section below and I’ll try to answer them all. The really important part about this is having fun during the shooting. All these setups can take a while and it can get quite frustrating to always clean up the balloon and prepare the next shot just for a process of picture taking that lasts well below one second. Especially, when I am experimenting with the trigger or the sound settings, it often happens that I set up everything correctly and just forgot one thing or the trigger doesn’t fire, so I end up flecked in paint and without a usable picture. Just remember: it’s all about the fun. And one more thing: put on some old clothes and cover all sensitive carpets or computers around.
Henning Huenteler is an enthusiastic amateur photographer from Germany, currently living and working in Beijing, China. He is mainly doing landscape and highspeed photography and is the author of www.shutter-lag.com.
OnOne Software Reduce Prices by up to 61% [Summer Sale]
One of the most popular ranges of post production tools among our community is that produced by onOne Software who produce a number of excellent individual tools for overcoming a variety of common problems in digital photography as well as their overall Perfect Photo Suite (a collection of 7 tools).
Late last week I received an email from the onOne team who let me know that they’ve just drastically reduced prices across their range for a special Summer promotion. The reductions are significant (up to 61%) and include:
OnOne’s tools can be used from within Photoshop, Lightroom, Aperture and in most cases as stand alone applications.
As a special promotion to dPS readers we’ve also got a coupon code that will get you a further 10% discount on any purchase. To get the discount simply use the code:
DPSDISCOUNT
Late last week I received an email from the onOne team who let me know that they’ve just drastically reduced prices across their range for a special Summer promotion. The reductions are significant (up to 61%) and include:
OnOne’s tools can be used from within Photoshop, Lightroom, Aperture and in most cases as stand alone applications.
As a special promotion to dPS readers we’ve also got a coupon code that will get you a further 10% discount on any purchase. To get the discount simply use the code:
DPSDISCOUNT
DIY Photography Ring Flash Review
DIY Ring flash + ambient light sources. Flash at 1/32 power, 1/160sec F7.1 ISO320, 51mm.
The assembled DIY Ring Flash with my Canon 580EX and Cybersync radio trigger.
Ring flashes are famous from the fashion world, where the classical make-up ad often uses the light frequently. By surrounding the lens with the light source, a cool ’shadowless’ light gives a unique look. But even when not used as the primary source of light, a ring flash can be an excellent on-axis fill, as championed by David Hobby of strobist.com.
The only problem for the hobbyist photographer is the price. Ring flash units cost hundreds or thousands of dollars. In recent years a string of new products let the photographer use their speedlights with a ring flash modifier to achieve the same effect for $200-300 – I own an Orbis ring flash myself. Even so, $200 is a big investment for a student, or a photographer who doesn’t know if they’ll get enough use out of a ring flash.
DIY Ring Flash
Enter DIY Photography with their flat-pack, self-assembly ring flash for $24.95. You might think that a ring flash modifier at that price can’t deliver on its promises, or must sacrifice too much. Having used it in a few shoots now, I can tell you it’s the real deal.
Though the DIYP Ring Flash is not without it’s problems and compromises, it is an amazing piece of equipment that can deliver exactly what it promises with only the necessary compromises. In short, every photographer who can get their speedlight off their camera should have one of these!
The Compromises
I’m going to be thorough and list every problem I could find with the DIYP Ring Flash, and there were a few. If you’re expecting to get a $200 product for $25 you’ll be disappointed. But if you’re aware of the following, then you can judge for yourself if the minimal cost is worth it.
Must be assembled. This is to keep the costs as low as possible and allow for easy shipping, but it only takes about 15 minutes, and isn’t too challenging.
Though greatly exaggerated in this photo with an extreme close-up, the unevenness of the catchlight is apparent. This typically is difficult to see, as in the photo at top.
Not very durable. The ring flash is made of a combination of plastic sheets and cardboard, and naturally isn’t going to last forever. Transport could be difficult as it could easily get crushed. It is also vulnerable to water damage. Of course this isn’t a problem if you’re only shooting in a studio.Uneven catchlights. The light distribution can be a bit uneven, and may vary slightly from shot to shot. This is only apparent in reflections, such as catchlights in the eye. Illumination across the frame of your photo will appear even.It’s physically quite large. It’s not practical to make a self-assembled modifier curved, so the corners protrude a bit, and might make it tricky to get very close for macro photos for which ring flashes are often preferred.Less efficient. When compared with my Orbis ring flash ($200) using the same flash (Canon 580EX) and settings, the DIYP Ring Flash delivers approximately 1.3 stops less light.Cooler WB. Also when compared to my Orbis, the DIYP Ring Flash delivers a significantly cooler colour balance (5350K vs 6450K). Green/Magenta WB was the same. With identical settings on the camera and flash power, the DIY Ring Flash (left) exposes approx 1.3 stops under the Orbis (right), and has a 1100K cooler white balance.
Can’t accept very large flash heads. The opening into which the speedlight is inserted is small, and larger flashes such as my 580EX require the corners of the opening to be cut to make room. My LP160 wouldn’t fit without cutting the cardboard further than I personally felt comfortable (but does into the Orbis). Good luck getting a Vivitar 285HV into this, or the Orbis.The flash isn’t held firmly. The cardboard opening doesn’t provide much grip on the flash, so it’s a little tricky to hold. An optional metal flash bracket is available ($9.95) for this purpose, but I found it to be a little bulky and preferred to handle it without. Also, the provided rubber bands to attach the flash to the bracket are a rather bright (and I think unattractive) pale blue.
The Advantages
It’s a ring flash! For $25! It’s hard to argue with the price, and the results are absolutely what you would expect when you use a ring flash.It’s light. Due to the flat pack low cost nature of the ring flash, it’s very light. Shooting for more than 15 minutes hand-holding my Orbis can be very tiring and painful. The DIYP Ring Flash weighs only grams.It works. Despite the lower efficiency and cooler WB, the resulting light is fantastic. If you are aware of these problems you can adapt and easily correct in post processing. Functionally, when corrected for, the light from the $25 ring flash is equal to that from my $200 Orbis.
When the differences are corrected, the results of the DIY Ring Flash (right) compare very well to the Orbis (left) which is eight times the price. The only apparent difference is the greater contribution of ambient light to the scene shot with the DIY ring flash, resulting from opening the aperture to compensate for the lower power. Alternatively the flash power could be increased to match the Orbis completely.
Get One!
I find a ring flash an invaluable tool in my lighting gear. Follow the link above to see how David Hobby uses ring flash, and you’ll open up a whole new realm of lighting possibilities. But do I recommend the DIYP Ring Flash as THE ring flash you should get? Well I won’t be giving up my Orbis. I use ring flash often enough that I need the durability of the tough plastic construction that comes with a more expensive solution.
However, unless you have a better ring flash, or are certain you need one, get this. If you are curious about ring flashes and want to try one out before you decide to get a more expensive model, get this. If you want to play with ring flash lighting but don’t have the budget for a more expensive model, get this. When you can get honest-to-goodness ring flash light for $25, why wouldn’t you?
You can purchase the DIY Photography Ring Flash here: http://www.diy-lighting-kits.com/ring-flash/
DIY Photography also stock a number of other products that will be of interest to photographers on a budget. Their product page can be found here.

Neil Creek is a professional photographer from Melbourne, Australia. He has been shooting with a DSLR since 2004, and blogging about his experiences since 2006. The focus of his writing today is about the journey he is taking from amateur to professional. View Neil's folio at his home page. Read his photography writing at his blog. Connect with him on Twitter.
The assembled DIY Ring Flash with my Canon 580EX and Cybersync radio trigger.
Ring flashes are famous from the fashion world, where the classical make-up ad often uses the light frequently. By surrounding the lens with the light source, a cool ’shadowless’ light gives a unique look. But even when not used as the primary source of light, a ring flash can be an excellent on-axis fill, as championed by David Hobby of strobist.com.
The only problem for the hobbyist photographer is the price. Ring flash units cost hundreds or thousands of dollars. In recent years a string of new products let the photographer use their speedlights with a ring flash modifier to achieve the same effect for $200-300 – I own an Orbis ring flash myself. Even so, $200 is a big investment for a student, or a photographer who doesn’t know if they’ll get enough use out of a ring flash.
DIY Ring Flash
Enter DIY Photography with their flat-pack, self-assembly ring flash for $24.95. You might think that a ring flash modifier at that price can’t deliver on its promises, or must sacrifice too much. Having used it in a few shoots now, I can tell you it’s the real deal.
Though the DIYP Ring Flash is not without it’s problems and compromises, it is an amazing piece of equipment that can deliver exactly what it promises with only the necessary compromises. In short, every photographer who can get their speedlight off their camera should have one of these!
The Compromises
I’m going to be thorough and list every problem I could find with the DIYP Ring Flash, and there were a few. If you’re expecting to get a $200 product for $25 you’ll be disappointed. But if you’re aware of the following, then you can judge for yourself if the minimal cost is worth it.
Must be assembled. This is to keep the costs as low as possible and allow for easy shipping, but it only takes about 15 minutes, and isn’t too challenging.
Though greatly exaggerated in this photo with an extreme close-up, the unevenness of the catchlight is apparent. This typically is difficult to see, as in the photo at top.
Not very durable. The ring flash is made of a combination of plastic sheets and cardboard, and naturally isn’t going to last forever. Transport could be difficult as it could easily get crushed. It is also vulnerable to water damage. Of course this isn’t a problem if you’re only shooting in a studio.Uneven catchlights. The light distribution can be a bit uneven, and may vary slightly from shot to shot. This is only apparent in reflections, such as catchlights in the eye. Illumination across the frame of your photo will appear even.It’s physically quite large. It’s not practical to make a self-assembled modifier curved, so the corners protrude a bit, and might make it tricky to get very close for macro photos for which ring flashes are often preferred.Less efficient. When compared with my Orbis ring flash ($200) using the same flash (Canon 580EX) and settings, the DIYP Ring Flash delivers approximately 1.3 stops less light.Cooler WB. Also when compared to my Orbis, the DIYP Ring Flash delivers a significantly cooler colour balance (5350K vs 6450K). Green/Magenta WB was the same. With identical settings on the camera and flash power, the DIY Ring Flash (left) exposes approx 1.3 stops under the Orbis (right), and has a 1100K cooler white balance.
Can’t accept very large flash heads. The opening into which the speedlight is inserted is small, and larger flashes such as my 580EX require the corners of the opening to be cut to make room. My LP160 wouldn’t fit without cutting the cardboard further than I personally felt comfortable (but does into the Orbis). Good luck getting a Vivitar 285HV into this, or the Orbis.The flash isn’t held firmly. The cardboard opening doesn’t provide much grip on the flash, so it’s a little tricky to hold. An optional metal flash bracket is available ($9.95) for this purpose, but I found it to be a little bulky and preferred to handle it without. Also, the provided rubber bands to attach the flash to the bracket are a rather bright (and I think unattractive) pale blue.
The Advantages
It’s a ring flash! For $25! It’s hard to argue with the price, and the results are absolutely what you would expect when you use a ring flash.It’s light. Due to the flat pack low cost nature of the ring flash, it’s very light. Shooting for more than 15 minutes hand-holding my Orbis can be very tiring and painful. The DIYP Ring Flash weighs only grams.It works. Despite the lower efficiency and cooler WB, the resulting light is fantastic. If you are aware of these problems you can adapt and easily correct in post processing. Functionally, when corrected for, the light from the $25 ring flash is equal to that from my $200 Orbis.
When the differences are corrected, the results of the DIY Ring Flash (right) compare very well to the Orbis (left) which is eight times the price. The only apparent difference is the greater contribution of ambient light to the scene shot with the DIY ring flash, resulting from opening the aperture to compensate for the lower power. Alternatively the flash power could be increased to match the Orbis completely.
Get One!
I find a ring flash an invaluable tool in my lighting gear. Follow the link above to see how David Hobby uses ring flash, and you’ll open up a whole new realm of lighting possibilities. But do I recommend the DIYP Ring Flash as THE ring flash you should get? Well I won’t be giving up my Orbis. I use ring flash often enough that I need the durability of the tough plastic construction that comes with a more expensive solution.
However, unless you have a better ring flash, or are certain you need one, get this. If you are curious about ring flashes and want to try one out before you decide to get a more expensive model, get this. If you want to play with ring flash lighting but don’t have the budget for a more expensive model, get this. When you can get honest-to-goodness ring flash light for $25, why wouldn’t you?
You can purchase the DIY Photography Ring Flash here: http://www.diy-lighting-kits.com/ring-flash/
DIY Photography also stock a number of other products that will be of interest to photographers on a budget. Their product page can be found here.
Neil Creek is a professional photographer from Melbourne, Australia. He has been shooting with a DSLR since 2004, and blogging about his experiences since 2006. The focus of his writing today is about the journey he is taking from amateur to professional. View Neil's folio at his home page. Read his photography writing at his blog. Connect with him on Twitter.
Subscribe to:
Posts (Atom)